Category Archives: lacto fermentation

This week in the kitchen – compote, apple cider vinegar, sauerkraut and pickles

This morning I wanted to get an early start in the kitchen this morning. I needed to take dd6 to an introductory meeting at her kindergarten at 9:45, and I was hoping to get some traction on some food preservation before then.

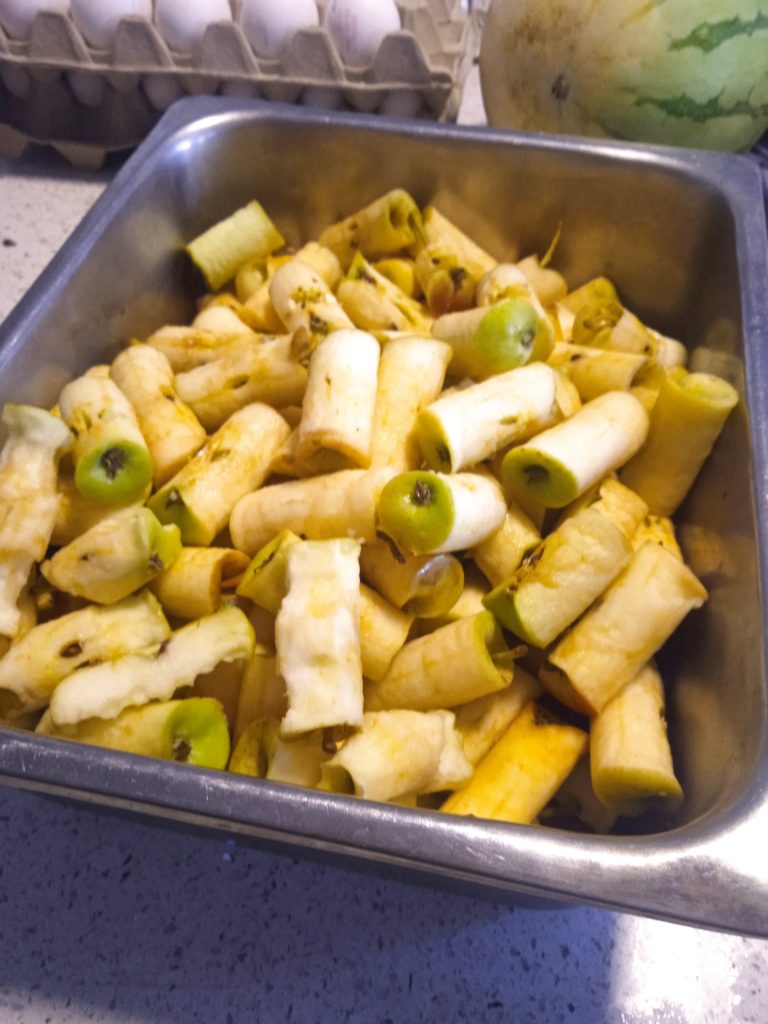
My husband brought home a bunch of apples yesterday. Sometimes I don’t get to fresh produce right away and I always regret it, because it’s so much easier to process food when it’s fresh and blemish-free. I have a apple corer-slicer-peeler but my apple corer sections apples into six pieces and is so much faster that I’m willing to use apples with peels on them. I wasn’t looking at the clock but I felt mighty quick in filling up two large pots with the prepared apples.

I haven’t done much food preservation lately, and today decided to make apple compote, which translated into fifteen quarts/liters once it was cooked. I add a little water, some vanilla and let it cook down slowly. It’s so flavorful and as it was cooking, several times dd6 and gd4 asked me what that good smell was! Usually I add cinnamon but I didn’t feel like it this time. Of course I canned all of those lovely jars so I can keep them on a shelf instead of in a fridge. It makes me smile thinking of pulling them out in a few months for dessert for Shabbos dinner.

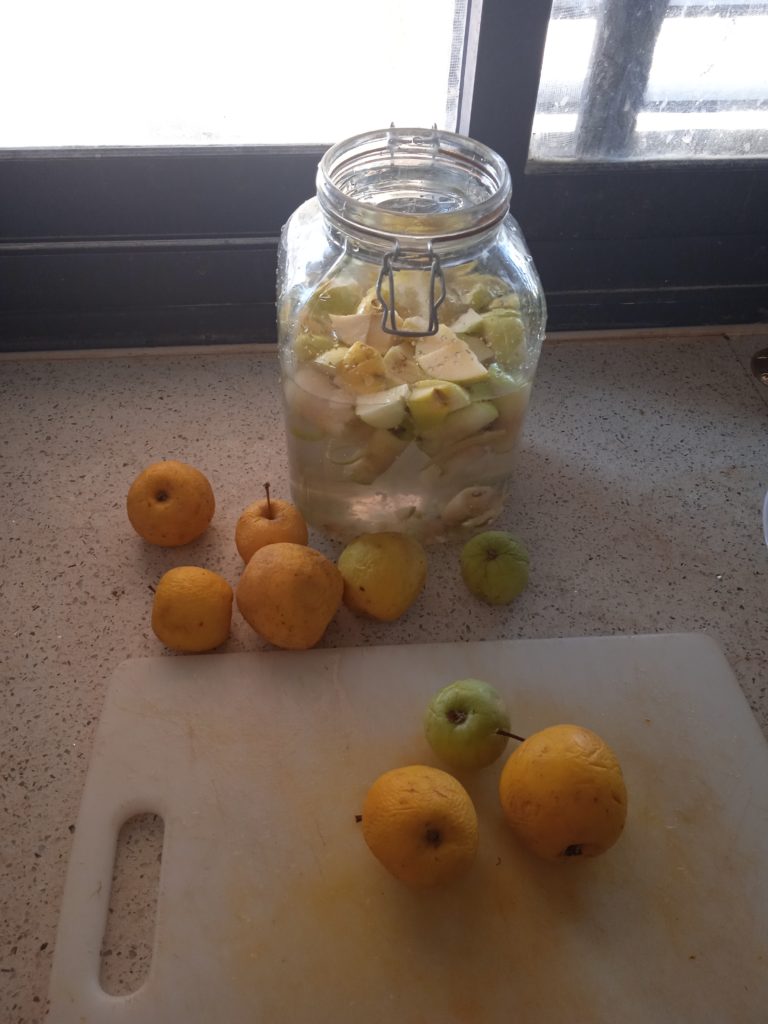
The next logical step was to do something with all the beautiful cores, so I decided to make apple cider vinegar.

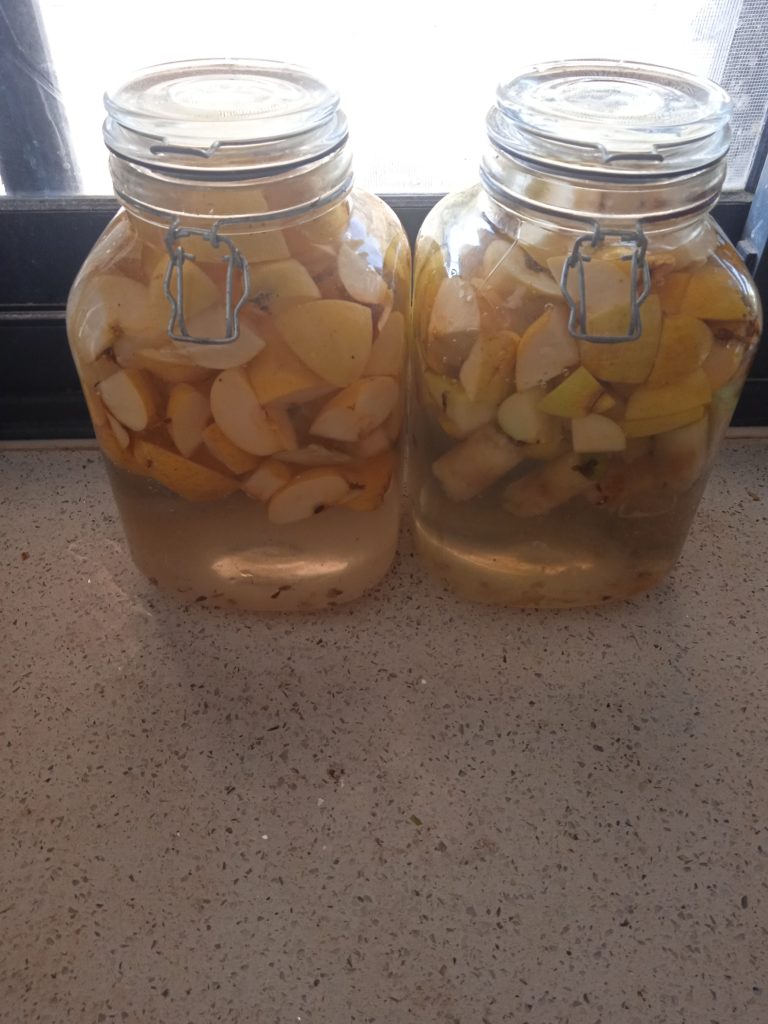
Making apple cider vinegar is really easy: first fill a jar halfway with apple scraps.

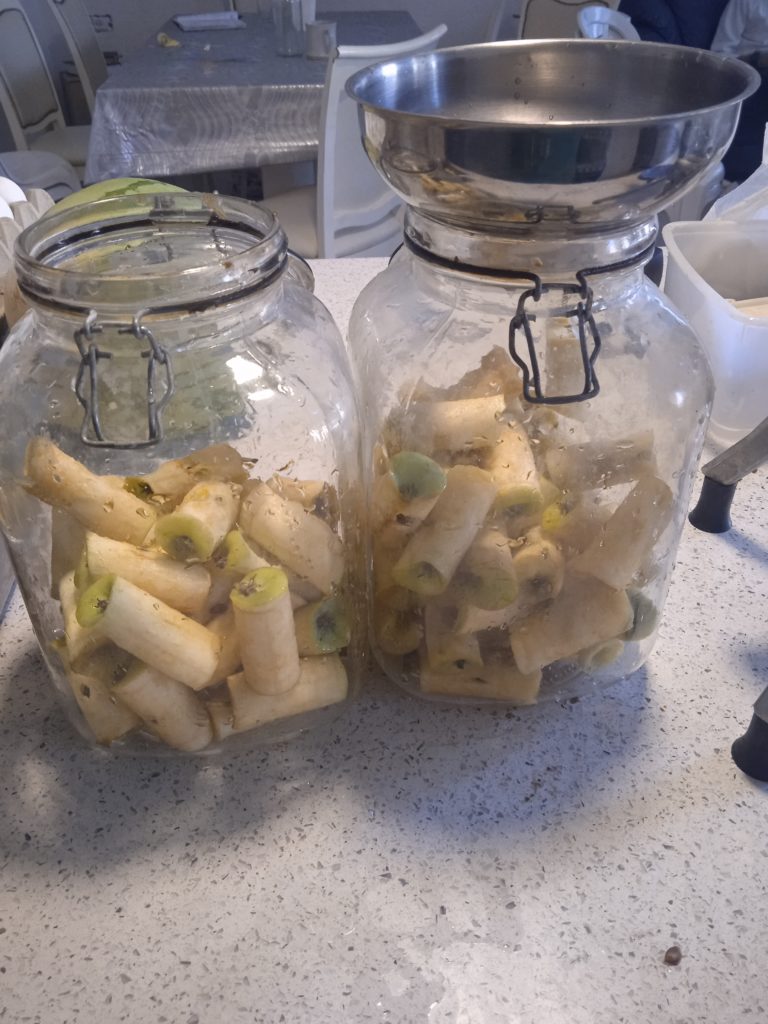
Add water to fill the jar until about an inch from the top. Add a tablespoon of sugar per cup of water you used.

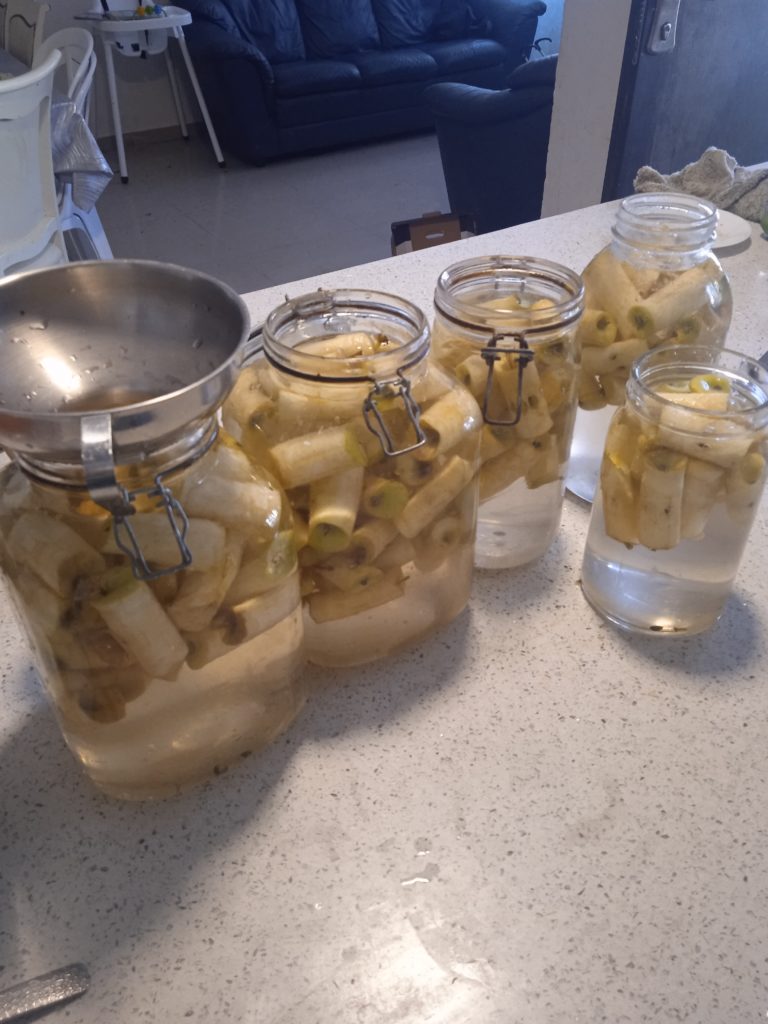
Cover it with a cloth and stir it once a day for a couple of weeks.

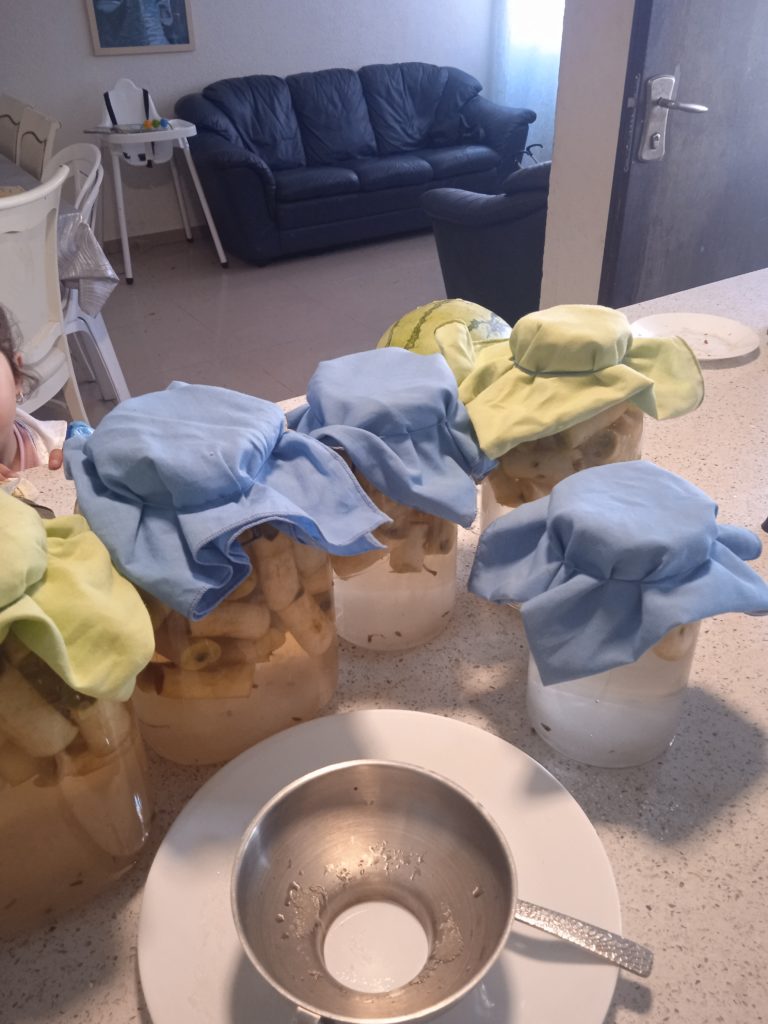
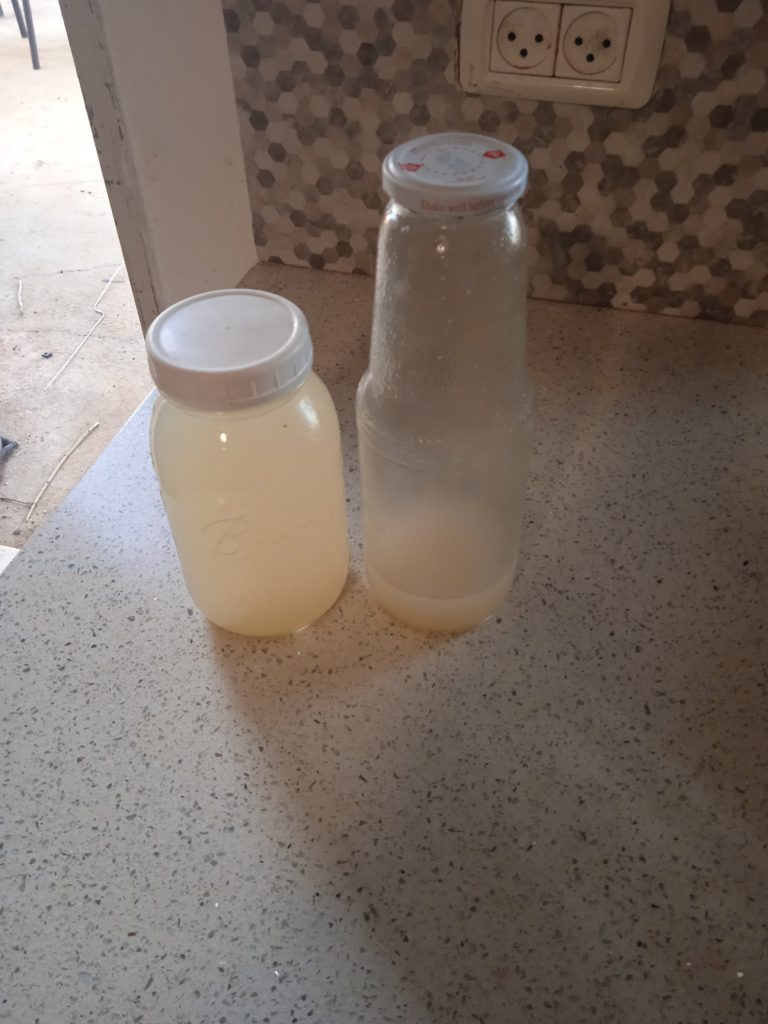
Then let it sit for a couple of months until it’s ready, and strain it out. That’s it.

I keep mine on the counter for the first couple of weeks so I can stir it daily to be sure everything stays submerged under the liquid , then put it away somewhere out of my immediate kitchen zone to finish fermenting. Last year I was really happy with how delicious the apple cider vinegar was. I told you then that it was so good I wanted to drink it by the cupful!

I got all that finished and had about forty five minutes to spend with my grandchildren before I needed to leave with dd6 at 9:40 am.

Later in the day, I turned my attention to the cabbages.

I wanted to turn them into sauerkraut, but I don’t have a cellar or basement or even a home that is usually air conditioned to keep the temperature low for an extended time. If I would shred the cabbage as I usually do, it would ferment within three days. Everything ferments much more quickly in the heat. I decided to chop the cabbage coarsely for the next batch so it would take a longer time to ferment. I made two four liter buckets full, which will be much less once it breaks down and compacts, but will still be a nice amount.

That was enough food preservation for today, first of all because I was tired and secondly because then I needed to make dinner, put the kids to bed early and leave to ds6.5’s introductory school meeting, this one only for mothers. It was on arriving there that I learned he’s going to be going into first grade, not gan chova (pre1A). His teacher looks wonderful, as all of the teachers in this school have been. I’ve been very happy with this school and feel so fortunate that by moving here, our boys have a great place to learn.

Tomorrow I have a meeting with ds6 and his new teacher. They started hiring staff a week ago and it looks like the gan is actually going to start on time on September 1st! Since my husband and older boys won’t be home at that time of day, I’m going to be taking the other three kids with me to this meeting. It will be short and everyone will enjoy seeing his school – the twins went to Siblings Day at ds11’s school and saw his class and ds6/5’s gan. And then I took everyone to see dd6’s gan prior to the meeting today.

Back to food preservation: a couple of days ago, for the first time in ages I made lacto fermented pickles. In the past I’ve sometimes made amazing, delicious pickles, but it’s so unpredictable how they’ll turn out – sometimes they are just not good. I finally decided to try it again, this time using bay leaves as the tannin source (tannin being the ingredient that keeps the pickles crunchy). Grape leaves are recommended and I have loads of them on my vine, but I have another year until we can harvest the grapes, and I don’t know if the grape leaves have the same status. No, it wasn’t important enough to me to call a rabbi to ask.

I wanted to use tea bags but I didn’t know where my husband put them and when I saw that bay leaves are a tannin source, figured I’d use them. I bought a kilo bag of bay leaves over a year ago. Do you have any idea how huge a quantity that is? I’ve hardly made a dent in them. So if these work well for crunchy pickles, there’s a lot more I need to use up. If you live locally and want some bay leaves, I’m happy to share. 🙂

After a day and a half, I put them in the fridge. I hope the experiment will be successful, since most of us in the family really like pickles, and they’re so much healthier, tastier and cheaper when you make them yourself.

Avivah

How to make apple cider vinegar

It’s fun when I discover how I can do things on my own that I previously assumed I had to buy or outsource to others, and making my own apple cider vinegar was one of these things!

It is so easy, frugal and healthy, that I can’t believe I didn’t make this until recently.

If you’re preparing apples for something else, you can save the peels and cores to use to make the vinegar. Technically this is called scrap apple vinegar. Since I try to minimize waste, making vinegar out of something destined for the trash (or in my case, the chickens) is a bonus. However, in terms of the final result, I made a batch of scrap apple vinegar and a batch of apple cider vinegar, and didn’t notice much of a difference between the two.

1- Fill a jar at least halfway with chopped apples or apple scraps. The flavor and color of the final product will be affected by what apples you use; it’s all good. I had a bunch of yellow apples that started getting wrinkly, so that’s what I used.

2- Add water to the jar until it’s just about at the top. Technically it’s best to use filtered water but I’ve always made ferments with tap water. The chlorine evaporates when left uncovered or when covered with a cheesecloth.

3 – Add sugar. The official ratio is 1 tablespoon of sugar per cup of water and 1.5 apples. (I’m not so exacting and didn’t find this formula for the ratio until after I had made a few batches, so I can definitively state that it will turn out fine if you use less. I used four teaspoons for each of the large jars you see below.) If you try to avoid eating sugar, don’t worry about it in this case; the fermentation process will eat it up and none will be left in the final product.

4 – Mix, and cover the jar with a cheesecloth to keep anything from getting in. You’ve now just about finished the active part of making apple cider vinegar. Basically you’re going to let it sit on your counter for a few weeks and stir it once daily. (That’s because the pieces will all float to the top, so stirring it will ensure no mold grows on top.)

5 – Let it sit a few weeks. Taste it. Do you like how it tastes? Then strain it and bottle it. Not ready yet? Let it sit another week or two. Refrigerate once ready.

That’s it!

I previously mentioned that I really liked the taste of this. My husband tasted my latest batch when it was still sitting on the counter, waiting to be strained, and he likes it, too, so it’s going fast!

There are lots of ways to use apple cider vinegar to benefit your health. Lots of people have written about it, so I’ll just link to one of them and let you read what they’ve written. 🙂 I can add, though, that one of my kids had dandruff, and when they washed their hair using this apple cider vinegar as a rinse just one time, there wasn’t a speck of dandruff remaining and the hair looked so shiny and healthy afterward.

Avivah

Busy in the kitchen – it’s the fall and it feels like harvest season!

My newest grandson’s bris was a week ago on Thursday, and all of our family members stayed for Shabbos, which was lovely. We held off on my birthday circle for a week to celebrate with more family present. I don’t remember what inspired me to begin the birthday circle tradition and when we started – though I know it’s been at least ten years – but it’s become so rich and meaningful to hear people share what they appreciate about the birthday celebrant, and I personally found it very touching and affirming. (My 28 year old son was amazed at the depth of what his 12 year old brother shared – he said he couldn’t have thought of things like that at such a young age. But then again, he hadn’t grown up listening to birthday circles for years by the time he was 12!)

Sandwiching the enjoyment of time with extended family has been different kitchen projects I’ve been busy with of late.

Making applesauce. Canning applesauce. Using apple scraps to make apple cider vinegar. Canning pomelos. Using the pomelo peels to make a citrus cleanser. Making washing soda. Mixing up a new batch of all purpose cleaning powder (which I’ve been using as a frugal eco alternative to laundry detergent). Making meat broth. Canning meat broth. Canning meat. Canning beans. Canning beef stew. Canning 21 pints of mandarin oranges, then turning them into 7 pints of jam. Making lacto fermented lemons. Harvesting moringa. Drying moringa.

Most of these were new projects to me, and new projects always take more time since I have to learn about it before doing it.

I canned low pressure foods like meat and beans when living in the US but sold my pressure canner when I made aliya over ten years ago. Since the winter I’ve been thinking I really, really want to have a pressure canner again, and been wondering how to get one from the US to Israel (since the shipping and taxes are so high if I have it shipped directly, it would be almost three times the cost of the canner itself!). It finally occurred to me to ask my sister if I ordered one and had it sent to her in the US, would she be able to mail it to me? I am so deeply appreciative for her willingness to help me out, and though I had only asked this favor with the agreement I would pay shipping costs, she refused to let me reimburse her (and shipping was more than the cost of the canner). I can’t tell you how happy I was when it arrived three weeks ago – it’s like having an old friend back in my kitchen with me!

This year I want to spend some time learning more about herbal remedies. I’m heavily reliant on vitamin C, because if you know how to properly dose (most people think that 1000 mg is a normal dose to take when sick and that’s hardly worth anything), it takes care of just about everything. Literally. However, it’s something I order from afar that I can’t manufacture on my own (at least not yet – as I wrote that, it occurred to me that maybe that’s something to research, too!) and with a shaky supply chain it’s foolish for me to rely so heavily on someone else for something critical to my family’s health. While every locale has its own medicinal plants available, learning to use them it requires learning and that takes time!

One beautiful plant I have growing in my garden is ‘sheba’. I didn’t know what it was when I bought it – I thought it was pretty so I planted it. I misspelled it in Hebrew when searching for the English translation, so I didn’t find out what it was for quite some time. I asked others who grew it if they knew what it was, and they told me it was very healthy and useful in multiple ways…but didn’t know the translation. I was excited to finally learn that it’s called wormwood, one of the most powerful anti-fungal herbs in the world. Right in my garden without me realizing it! This morning I was noticing how lush it’s become and it needs to be harvested. That’s now been added to my list of things to learn about. 🙂

Busy and blessed, that’s me!

Avivah

How to make yogurt

Yesterday I made a large batch of yogurt, something I haven’t done in a while. I had forgotten how extremely easy it is to make, and it’s about a third of the price of the least expensive store yogurt!  I made a very large recipe of 1.5 gallons (24 cups), but the recipe below is for a more moderate amount.

Homemade Yogurt

  • 2 c. milk
  • 2 T. yogurt to use as bacterial starter (look for any plain yogurt at the store that says it has bacteria in it – eg. acidophilus- you can get the smallest cup size sold)

I used organic whole milk, but you can use any kind of milk you want.  Put the milk in a pot, and heat it until almost boiling, 180 degrees.  I have a candy thermometer for this, which eliminates the guesswork.  Once it reaches that heat, turn off the heat and let it cool down to between 105 and 110 degrees.

Stir in the yogurt.  Don’t let the temperature go below 105 degrees before you pour into a jar, then cover the jar with a lid.  Now put the jar somewhere warm where it can incubate overnight.  An oven set to 100 degrees is perfect, but you can also put the jar into a picnic cooler.  If you’re using a cooler, line it with a towel, put the jar in, and cover it with a towel.  Some people put a heating pad set on low on top of the towel, or a hot water bottle, to keep the temperature constant, but if you make several jars of yogurt, then the heat from the jars will keep all of them warm without anything extra.  It should be ready within eight to twelve hours.

I did a couple of things that made the process even easier.  First of all, I left the yogurt to incubate in the covered pot I heated it in.  Then I removed the trays from my dehydrator and put the entire pot inside (set at 100 degrees).  And that was all we had to do, except eat large quantities of it for breakfast. 🙂

You can add flavorings if you like. This morning I had mine with some fruit spread that I canned a while back, and it reminded me of a healthy version of the yogurt cups with fruit at the bottom when mixed together.

Avivah

Kefir soda

>>What do you guys drink? Just water, or do you make other drinks? What drinks do you make, and how? <<

This was a very timely question, since I was planning to post about our newest adventure in culturing. 🙂 

Generally, we drink only water.  That doesn’t include milk or kefir for breakfast, and we have herbal teas in the winter, but basically that’s it.  I very rarely buy juice – maybe twice a year at the most.  I never buy soda – never.  This past winter, I got some juice concentrate, thinking it would be the most efficient way to mix the vitamin C powder the kids take when they’re starting to feel under the weather; rather than buying and wasting a large prepared container of juice, I could just take out a spoonful at a time.  But BH, it was a healthy winter and we didn’t need to take vitamin C often so the concentrate has stayed in the freezer and I was wondering what to do with it, except use it to make juice sweetened jam.

It occurred to me that I could transform a very low quality food (the juice concentrate) into something of nutritional value if I cultured it.  Before Pesach, a friend offered me water kefir grains but it wasn’t until a few days ago that I got them.  Water grains are used for culturing juices or a water/sweetener/fruit mix.  I mixed up the grains with a can of concentrate and a quart or so of water, and let it sit on the counter for a day.  As it cultures, the sugar is ‘eaten’ by the kefir bacteria. Then we strained out the grains and drank it – couldn’t be easier!

This is a new project so I can’t give you lots of different recipes I’ve tried.  So far I’ve made it three times with orange juice concentrate, and the kids really like the results.  It becomes fizzy and less sweet as it cultures and turns into kefir soda (though you don’t want to leave it too long because it can become alcoholic).  How long you culture it will depend on the temperature in your home –  our house is pretty warm in the summer since we don’t use air conditioning so it cultures very quickly.  

 When I run out of concentrate, I’ll use the following recipe: 

  • 1-2 tablespoons water kefir grains
  • Filtered water (I didn’t use filtered water but it doesn’t seem like I killed my kefir grains; I’ll try to remember to next time)
  • 1/4 cup sucanat or sugar
  • 1 teaspoon molasses (only if you’re using white sugar)
  • Piece of an egg shell, rinsed (half of the egg shell will do)
  • 1/4 c. fresh or frozen fruit, whatever flavor or combination you like – there are lots of possibilities
  • There are a couple of ways to do this:  1) Some people like to mix all of the ingredients at once and do a one time ferment.  This means putting everything together in a glass jar and leaving it on your counter until it tastes ready to you.

    2) Others prefer to do two separate ferments.  That means first culturing all the ingredients except the fruit, straining out the grains and then using the fermented water together with the fruit for a second ferment.  Supposedly this keeps the kefir grains pure. 

    After the kefir soda is ready, I put it into a glass jar in the fridge.  If you want to be fancy you can get glass bottles that you can fill individually.  This is a good juice or soda substitute because it’s filled with good probiotics, so not only does it taste great but it’s good for you!  And it’s very inexpensive, too!

    Avivah 

    Curried Carrot Sauerkraut

    Here’s the recipe for my latest fermented vegetable experiment which I slightly adapted from Baden:

    Curried Carrot Sauerkraut

    • 1/2 head green cabbage, finely chopped or shredded
    • 1/2 head purple cabbage, finely chopped or shredded
    • 6 – 7 carrots, shredded
    • 1 small onion, finely chopped
    • 1 – 2 cloves garlic, minced
    • 1 1/2 – 2 T. curry
    • 2 t. salt (I use coarse Celtic)

    Mix all of the vegetables together, and then mix in the curry.  Pack the mixture into glass jars. Add filtered water until the combined vegetable juices (if any) and water just cover the vegetables; add sea salt to the top.  Make sure that all of the vegetables are covered with liquid.  When there isn’t enough liquid, the vegetables on top will get moldy instead of fermenting.  Leave about an inch between the top of the liquid and the jar to allow room for the juices to expand.

    Cover with a tight lid or a cheesecloth and rubber band/ canning jar ring – the second option allows the gasses that build up to be released so you don’t find liquid leaking out all over your counter the next morning.  Sally Fallon of Nourishing Traditions says that because lacto fermentation is an anaerobic process, once the fermentation has started the presence of oxygen will ruin the final product, but I’ve tried it both ways (with tightly fitting lids and with cheesecloth) and haven’t found that to be the case.  Leave it on your counter to ferment for a few days or as long as it takes until the vegetables are all soft.  If the cabbage kind of squeaks in your teeth when you eat it, it needs to ferment more.

    There are a couple of things to be aware of in the summer.  The first is that because of the heat, the liquid will evaporate more quickly from the jar, so if you don’t use a tightly fitting lid you need to check it daily to be sure that the vegetables are still covered.  The other thing is that things ferment much more rapidly in the heat.  The faster something ferments, the stronger the flavor will be.  Cabbage needs to ferment longer than some vegetables;  I like to let it ferment for 4 – 5 days on the counter, and then transfer it to the fridge to continue the fermenting.  Since it continues fermenting in the fridge, but more slowly, it has a more mellow flavor.  If you ferment it at room temperature in hot weather, the flavor will be stronger.

    You don’t have to use a mixture of green and purple cabbage, but I think it looks pretty so that’s why I did it.  It has a nice medium purplish color when it’s done.  This is meant to be eaten as a relish or condiment to your meals; I enjoy it in small amounts but find the flavor gets to be too much if I have a large serving.

    Avivah

    Quick answers – fermented veggies and dehydrating

    >> the fermented veggies- sea salt is just regular salt? Or is it something different? How much salt do I put in? Can you ferment cooked veggies? How long does it last once fermented? <<

    Sea salt is different than regular salt; it’s less processed.  Depending what kind of sea salt you get, it’s significantly less processed.  I don’t really use regular salt – I use a fairly processed sea salt for cooking, Real Salt (that’s the brand name) for salting food at the table, and Celtic sea salt when I make fermented vegetables.  Celtic salt is pretty pricey but I don’t use much of it so a little goes a long way – it’s a grey, moist, and kind of rocky, not finely ground.  I feel like it improves the nutritional value, but regular salt would probably work just fine, too. 

    How much salt you put in depends on how many vegetables you use, and how salty you like your food.  I’d suggest googling for some recipes.  I use about 2 T. salt for a half gallon jar of vegetables.  And you wouldn’t ferment cooked vegetables, just raw.

    Be aware if you decide to make fermented vegetables that they will have a different taste than pickled vegetables.  For many people this is an aquired taste.  Be sure to carefully follow the recipe the first time so you know that nothing spoiled in the process, and then when you taste the veggies you’ll know that they taste the way they’re supposed to.  If something you makes doesn’t turn out the way you like, don’t give up.  There are lots of good recipes out there, and some are going to be more appealing to you than others.  I used the recipes in Nourishing Traditions to start with, and found that most of them were too salty for me, so I adapted them to what we prefer. One recipe I found very easy to start with was making pickles (from cucumbers), because the taste is familiar.  These get gobbled up.

    Remember also that fermented veggies are eaten in small amounts as a digestive aid, not large salad quantities. 

    >>You inspired me to get a dehydrator- have you made jerkey in it, or not your style?<

    I haven’t made jerky, not because it’s not my style, but because I want to keep the dehydrator parve. For the same reason, I haven’t made yogurt-fruit leathers.  But both of those things would be fun to make if I had the luxury of separate dairy and meat dehydrators.

    Avivah

    Making kefir

    I love making kefir!  I didn’t make it very often or very regularly this winter, but now I’m back into it being a regular part of my daily routine so I thought I’d share about it with you.

    Kefir is cultured milk, packed full of fantastic probiotics.  You can buy ready made kefir in stores for an outrageous price (and you know I won’t advocate this!), or you can make your own.  If you decide to make your own, you have a choice of using a powdered starter or kefir grains.  The powdered starter needs to be purchased periodically, whereas the kefir grains can last forever (unless you are like me and don’t treat them well, or one of your family members throws them away :)).  The cost for kefir grains can therefore be a one time expense.  If you’re lucky enough to get some from someone who has extra, they can be free or a very low expense.

    I’ve been able to get kefir grains from an individual, though I’ve damaged their ability to propagate (kefir grains grow).  But they still work just fine, and yesterday I was amazed to see just how effective the grains I have are.  I only have about a teaspoon of grains (grains look like a clunk of pinkish cauliflower).  Anyway, until now I’ve always made kefir in a quart jar, but a quart is such a tiny sized amount for our family that I had to ration out servings to be sure everyone would get some.  However, we recently finished a gallon sized glass jar of olives, and after cleaning it, removing the label, soaking it with baking soda to remove any odor, and toiveling it, it was ready to be used as my new family sized kefir jar. 

    To make kefir, all you have to do is put the kefir grains in a glass jar, add milk, and leave it at room temperature until it cultures.  It’s misleading to say you’re making kefir, since it practically makes itself.  In warm weather it cultures very quickly; in cold weather it takes longer.  I put my grains in our new large jar, and was curious how long it would take to culture a gallon of milk, since it was such a small amount of grains.  I started it in the afternoon, and by breakfast the next morning (ie less than 16 hours), the entire jar was ready.   I was delighted, and so were my kids, since now I can be more generous with how much I give them. 

    If you want to know more about kefir, you can check out the following site: http://users.sa.chariot.net.au/~dna/kefirpage.html.  If you read even a small part of it, you’ll know more than most people do about kefir.  I’d encourage everyone to aquire some grains and make some kefir for yourself and your family – it’s very inexpensive (basically just the cost of the milk, once you have the grains), and it’s a wonderful health supplement that strengthens your digestive health.  One thing I like about kefir grains is that you can transform the nutritive value of regular store milk by culturing it.  I used to only use raw milk for everything, but then I’d run out before my next shopping trip.  Now I mostly use the raw milk for drinking and pasteurized milk for culturing – it would be better if I could use all raw for everything, but I simply don’t have enough room in my freezer to buy the amount I need to last from one shopping trip to the next (unless I drastically cut down on the amount of milk we use). 

    As far as taste, it’s kind of like a sour liquidy yogurt.  Lots of people like to blend it up with fruit or something else for a breakfast smoothie, but we like it just fine on its own.  If I were making a smoothie, I’d add coconut oil, fruit, and spirulina powder for a nutritionally charged breakfast. 

    When the milk cultures, if you let it sit long enough it will separate, with the curds rising to the top and the whey remaining at the bottom of the jar.  I stir it together before drinking it, but you can also take out the thick and creamy curds at the top to eat, and put aside the whey to use as an acidic medium to soak your grains in.  There are other uses for whey, but I can’t think offhand of what they are since I don’t do anything else with it. 🙂

    If you use only chalav yisroel, then you’ll have to take some extra steps to be able to use milk grains.  A friend I have who checked out with her rav how to handle it told me the following: you have to make and discard three batches of kefir from the grains before you can drink the kefir – ie, the fourth batch is okay.  But ask your rav for guidance; I’m just passing on what she told me. 

    In our home, the kefir jar is now back in its regular place as a countertop ornament. 🙂

    Avivah

    Making lacto fermented vegetables

    This was a new thing that I started doing about three weeks ago, and it’s been very successful.  Like the sourdough bread, I thought it would be a big deal to make, and it’s amazing how incredibly simple it is.

    Let me backtrack a minute and say what lacto fermented vegetables are, and what the benefit of them is.  It’s a natural method of pickling that was used by traditional societies throughout the world until vinegar was created and replaced lacto fermentation because the results were easily duplicated and consistent.  But vinegar kills all the microorganisms, while lacto fermentation enhances the nutritional value of vegetables by enhancing the growth of lactobacilli, which enhances the vitamins, aids digestion and helps produce other helpful enzymes.  Lacto fermented veggies are a good addition to any meal because they help all the foods be better digested.

    So here’s how incredibly easy it is: you take a quart sized jar, chop or shred up the vegetables you want to ferment, and pack it in as firmly as possible so that the juices of the vegetable(s) cover the top.  If there isn’t enough juice for that, you add some filtered water to cover.  Add some spices if you want.  Put in some sea salt at the top (I use Celtic sea salt for this), close the lid, and voila – after two days to three days your veggies are ready.  That’s the basic process in a nutshell. It took me making about six different recipes to realize that it was all this basic process, since there were little variations of ingredients and spicing for all of them.

    Using this basic process, we’ve so far made: cucumber pickles (my 5 and 7 yo kids did these), pickled tomatoes and peppers, ginger carrots, kimchi (so far the favorite), beets, roasted red peppers, turnips, sauerkraut, preserved lemons, salsa, horseradish, garlic, daikon, and a veggie mix of my own creation (second favorite).  A bonus is that they look very attractive lined up on the kitchen counter.  🙂

    Though they can be ready in as few as 2 – 3 days, they can stay out for lots longer than that.  That’s nice because there aren’t suddenly lots of pickled vegetables that all have to be eaten at the same time.   And I don’t know about you, but I often find that I don’t serve as many salads or fresh veggies at mealtimes because of the time it takes to prepare.  Now even at my busiest, I can whip out two or three of these at mealtime – no preparation needed but to put it in a serving bowl!

    I’ve also made pineapple vinegar, but have yet to use it for anything.  I’m planning to use it for salad dressing and for some of my next batch of fermented vegetables, but I still have about 8 jars on the counter, fermenting away, so I’m not rushing to make any more right now. I combined the two quarts of preserved lemon into one jar when it was finished and drained out a bunch of the liquid for salad dressing – it’s delish!  I’ve been using it every day by itself as dressing for my lunchtime salad.  Since I poured it into a salad dressing container (there was just a little of the original stuff left so I poured it out to make room for this), everyone, guest included, has been using it on their salads and is none the wiser.  🙂

    Making sourdough bread

    Here’s another of my new culinary experiments – sourdough bread.  I began my making the starter, and I’ve found it very interesting to see how it works.  I never knew much about it, but it seemed intimidating to me.  Basically, a starter is homemade yeast.  You just mix some water and flour, leaving it covered at room temperature for a day.  Then the next day add a cup of flour and water each, and continue this for seven days, while it continues to stay at room temperature (covered so nothing gets in it).  I found it fascinating to see how the microorganisms all around us can be grown in a way that contributes to our health. (Ideally you should use non chlorinated water but I’ve done it with sink water and it’s still worked.  You can also let the water sit overnight so that the chlorine evaporates.)

    At the end of seven days, you use some of the starter as the leavening agent for bread, and mix in some more water, flour, and salt.  (I used the recipe in Nourishing Traditions.)  Stick it in a loaf pan, place it in y0ur unheated oven, and let it rise overnight.  Letting it rise long enough is really important to the quality of the final loaf – the second time we made it, dd13 was doing it and she let it rise for only an hour in a warm oven (she’s used to baking yeasted doughs) and the final result was so heavy that it was hard to chew.  Bake for about an hour at 350 degrees.  We baked it when we got up in the morning and enjoyed it fresh from the oven with butter for breakfast.  Yum!  It was a dense loaf, but very flavorful.  Since it was so much heavier than regular yeast loaves, it only took a couple of slices to be satisfied.

    I think that I’ll start to make this once a week since everyone is enjoying it.