Category Archives: dehydrating

My new steam juicer, clearing out the freezer, and finally fixing the dehydrator

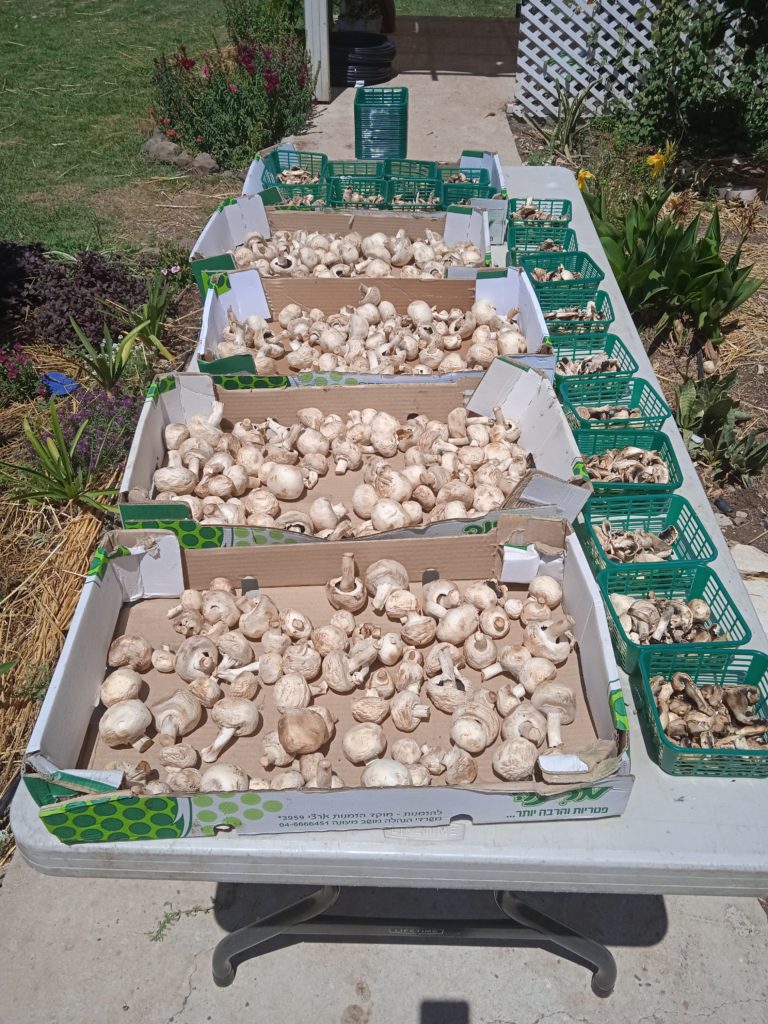
My son recently visited the US and brought back for me my latest kitchen tool, a steam juicer. I had put a lot of grapes in the freezer knowing he would be bringing it to me when he came for this past Shabbos, and yesterday I had a full day of experimenting with my new plaything.

A steam juicer is basically a large pot that has three sections that nest inside one another: the bottom holds the boiling water, the middle collects the juice, and the top is a colander that the fruit or vegetables are put into. There is a plastic tube that leads from the center juice receptacle to whatever container you want to put the juice in.

The basic idea is that rather than blend/mash/cook/strain the grapes to make juice, you can steam them and skip all those steps. It took longer than I expected for the juice to be extracted and I was a bit impatient waiting for it to be done, wondering if this had been a worthwhile purchase or not. After a few hours I realized that I had slowed down the process significantly by not keeping the juicer at a high heat the entire time. (I was afraid that the water in the bottom section would boil dry, and thought that keeping it at a simmer would be effective and minimize the likelihood of burning the pot). Once I realized my mistake, it went much more quickly. But it’s not a fast process.

The last time I made grape juice I added water while the grapes were cooking. Since I wasn’t sure of the exact dilution, there was a question about if the bracha was still hagafen or not, so we didn’t want to use it for kiddush on Shabbos. This time I made sure it was 100% grape juice.

Once I had eight liters of juice, I began canning the juice in jars so they would be shelf stable, while simultaneously adding a fresh batch of grapes to the juicer. In the end I processed 16 quarts of juice.

My conclusion on the steam juicer is that I’m glad that I bought it since the actual hands on time to make the juice is cut down quite a bit, so I was able to do other things while the steamer basically made the juice for me. The end product is nice and clear, and the flavor is excellent. Now that I have a steam juicer, I’ll be looking for other opportunities to put it to use and justify the space it takes up in the cabinet!


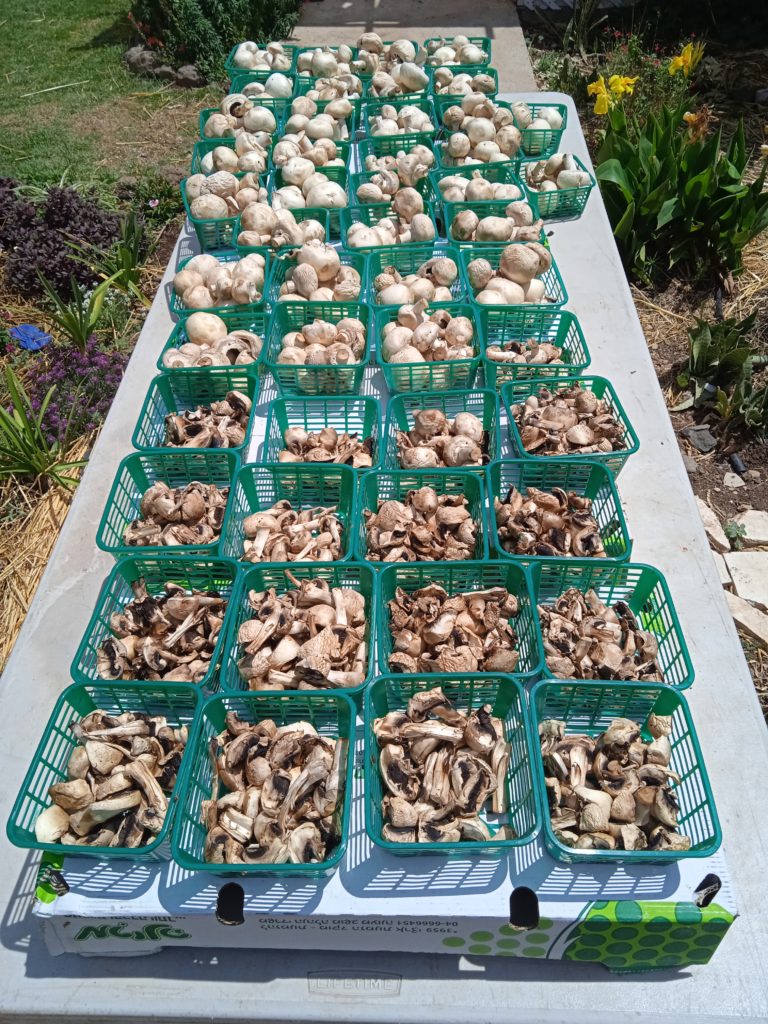
I bought my dehydrator back in 2009, and it served me well until last year it suddenly stopped working.

I wasn’t sure what was wrong with it, but since it’s basically a simple contraption, figured it could only be one of two possibilities. When I originally bought the dehydrator, I got a reconditioned one for $150. To buy the same thing new at this time would be $319, so the investment in a couple of parts seemed like a worthwhile choice. I bought a thermal fuse and a motor from the online store for about $50, but they don’t ship to Israel so I waited for many months until my husband made a trip to the US and was able to bring them back.

My husband brought back the replacement parts in February but putting them in was low on the priority list of projects. When he was ready to replace the parts, the transformer had blown. Since I bought and used my dehydrator when living in the US, it runs on 110 electricity and needs a transformer to be used here. I had to get the part for that to be fixed before working on the dehydrator.

I was taken aback and discouraged that I couldn’t find any local hardware stores that had the size fuse I needed. I made two separate trips to RBS over a period of several weeks and each time looked for the fuse; thankfully I finally found it the second time, when I took the boys to yeshiva for their first day. I did not like that several of my appliances are dependent on a five shekel fuse that I couldn’t find, and they couldn’t be used for weeks while I was searching for the fuses. I don’t want to be in that situation again if I can help it, so when I found them, I bought four extras to have on hand.

After all this time and effort, I finally have a working dehydrator again! I wanted to clear the freezer since I’m getting my chicken and meat order for the holidays soon, and need to make space. In addition to taking out the grapes, I took out all the frozen peas and frozen mixed vegetables, four bags of each, and put them all in the trays to dehydrate.

Once they were finished drying and had cooled off completely, I put them in containers on the shelf, and am ready for my meat pickup later today! I like canning so much and it has its advantages, but it can’t compare with how compact and lightweight food is after being dehydrated.

Avivah

Another new grandson, canning activities, making cheese

On Wednesday evening, my daughter gave birth to a baby boy!

I told my neighbor yesterday, and she looked confused. “I know…you went to Jerusalem for the bris.” No, that was two and a half weeks ago – this is a different daughter!

Who knew when our two daughters got married twelve days apart, that they would later have baby girls 2.5 months apart, and then baby boys 2.5 weeks away?! It’s so special.

Thank G-d, this is our fourth grandson in the last 12.5 months, making for, as my sister said, “A bumper crop of boys!”

This was my daughter’s third birth, but first homebirth. It was so nice to see her an hour later in her own space, looking relaxed and happy. As she said, a homebirth is a completely different experience than a hospital birth.

Now they’re here with us for a few days, and I’m tapping away at the keyboard with this tiny cutie pie on my lap.

One hour old.
————————————–

After dashing out to meet my new grandson, I came directly back home where several women had already arrived for the canning workshop that I was giving that evening. I offered a canning workshop for women in our community several weeks ago, and then did this second one for women who couldn’t make it to the first one.

What I covered was waterbath canning, something that can be done very inexpensively with supplies that are probably already in your home or inexpensively purchased. Canning is a good strategy to make the most of great produce sales, to extend the seasonality of your fruits and vegetables so you can enjoy the when they are no longer in season.

Waterbath canning is good for high acid foods only – that means fruits, fruit juices and pickled items. So while it’s limited, it’s still a great skill to acquire for your frugality and self-sufficiency toolbox.

It took me some time to figure out how to can things here since the jars and lids are different from the US, where most of my canning experience was. I did a bit of canning when I first moved to Israel using recycled jars, then stopped until this summer. What changed things for me was finding where to buy jars very affordably, and how use them. It was a drive to get to the seller but worth it, since just a day after I bought them, someone in my community who does holiday food distribution called to tell me they had given out all the parcels and were left with some produce. Did I want any? Perfect timing!

It’s been fun to get back into canning! There’s a limit to how much fresh fruit you’re going to get, even if it’s free, because there’s a limit to how much you want to eat, and there’s a limit to how long it will stay in your fridge before it goes off. In this case, I got a case each of apples and pears, and with the help of my new jars and large stock pot, preserved them so they are now shelf stable.

————————–

When I went to Jerusalem for the bris a couple of weeks ago, my son-in-law asked me if I wanted zucchini. He knows the quantities of food we go through, and he also knows that I find ways to use whatever comes my way! (Frugality tip – when something is offered and it seems like something that will be helpful, accept it even if you aren’t yet sure what to do with it! You can pass it along to others if you don’t use it.)

At his yeshiva, many families participate in a vegetable buying order; every week each family gets an identical box of assorted produce. They pick up their orders at a central location, and when someone doesn’t want an item that was in their box, they put it to the side. Anyone who comes to pickup his box can add to the extra produce put to the side or take it. On the Friday that we were there, there was a lot of zucchini, and my son-in-law brought me a case and a half!

What to do with so much zucchini? I could have chopped them and frozen them, but am trying to get away from using my freezer so heavily. I don’t like to depend exclusively on something that is dependent on electricity. (I remember well being without power for a week in Baltimore when a storm came through, and trying to cook all the chicken in the freezer before it spoiled, as the daylight faded and I had just a candle for light.) I decided dehydrating the zucchini in the oven would be my best option, but all three batches failed – one spoiled (not hot enough), and two got overdone when the heat was too high. Our chickens enjoyed them, at least.

Since it was clear dehydrating wasn’t working in this case, I thought about what to do with the remaining zucchini. I could can them, but as a low-acid food my only choice was pickling them, and that didn’t sound appealing.

When I began canning in 2008, I made lots of the recipes in the canning books. They looked good and filled the jars, but they weren’t foods that we ate. I learned my lesson – now I won’t can something unless it’s something I know I’ll use.

I started cruising for zucchini inspiration and came across a comment about mock pineapple that got my mental wheels turning – I started thinking about zucchini as a potential palette to absorb other flavors. With some more looking, I found recipes for apple pie and lemon pie filling made from zucchini, as well as pineapple zucchini. It sounds strange, I know. I think of it like tofu. It doesn’t taste like much on it’s own but it can turn into whatever you want.

I made the mock pineapple, and when one of the jars didn’t seal when processing, we put it in the fridge and had some the next day. My boys told me it actually tasted like pineapple and was really good!

———————————

The mock pineapple was especially yummy with homemade yogurt, made by ds14. We got a call a couple of nights ago (from my other son-in-law) that a large synagogue was giving away tons of milk that was due to expire a day later. We got a bunch and while I was out at choir practice, ds14 was busy making loads of yogurt. Literally – he made an 18 liter bucket full! (You can see it behind him in the picture below.)

Making cheese

Then over the next couple of days, he and ds12 experimented with making soft cheeses, adding flavorings, straining them, weighting them down. They are using only lemon juice and vinegar for a curdling element, no rennet. My favorite so far was made by ds12, with milk, salt, eggs and yogurt. It takes a lot of milk to make cheese, and it’s fun to experiment when all the milk is free! My boys appreciated the opportunity since they’ve been wanting to experiment with cheese making for quite a while. (A while back ds14 did some cheesemaking, but that ended when the budget I allotted was spent.)

This was my favorite so far, by ds12 – it sliced up really nicely in firm slices. He weighted it down quite a lot to squeeze the liquids out.

The shalom zachor will be at our home tonight, and today will be a busy day getting ready for that as well as Shabbos. Dd21 and ds15 came home last night so they can be here for the shalom zachor (they were initially planning to only next week for the Thursday bris and then stay for Shabbos), and since my birthday is tomorrow I appreciate them being here even more!

Avivah

Dehydrating mushrooms in the sun

Yesterday someone dropped by and brought along a couple of small baskets of mushrooms. He said they were being given away, and because the location they were given out was outdoors, they were going to spoil quickly.

I headed over and got lots of mushrooms in perfect condition, and decided to maximize the bounty by dehydrating them to use at a later time. However, a piece on my dehydrator burnt out a few months ago, so it’s now a bulky plastic box that isn’t of much use. I had been thinking of building a screen covered kind of box about the size of the dehydrator, that I could slide the dehydrator trays into and use outside. But that hasn’t happened so I had to improvise if I wanted to take advantage of this opportunity!

In any case, I live in a hot, dry climate, so doesn’t it seem like a waste to use a machine to mimic what nature is doing all day long for free?

I sliced up several of the baskets of mushrooms, then put them back in the baskets and set them out in the sun. Meanwhile, I thought about how to dry the rest of them. Maybe, I mused, I could thread the whole mushrooms with fine fishing line and string them up in the sun.

This morning I thought of an obvious solution. I set up a folding table in the sun, then put the cartons the baskets of mushrooms came in, upside down on top of the table. Then I put the mushrooms on top of the cartons (so there would be air flow underneath) in the original baskets they came in.

Dehydrating mushrooms

You can see the sliced mushrooms in the front are dehydrating very nicely (they had a head start over the whole mushrooms). I went out after a few hours to check on them, and realized if I put the cartons right side up and put all the whole mushrooms inside, they would dry even more quickly and it would eliminate the need to rotate them. This was a good option once they were dry to the touch.

I’m very optimistic about this! If this works well, it was quick and easy to set up and because it’s so hot, there’s not a single fly or insect anywhere near them! (I will cover them with a screen if I see any flies.) I’m hoping they’ll all being completely dried by the time the sun goes down tonight, and also hoping to experiment further with solar dehydration over the summer.

Edited to add: the sliced mushrooms were finished in a day; the whole mushrooms were almost finished in two days but I put them out for one more day to make sure there wasn’t any moisture that could lead to molding once I stored them. Here’s what it all looked like once it was done:

The sliced mushrooms are in the container on the front right; the other two containers are filled with whole dried mushrooms, which can be used whole or cut up when cooking. As you can see, they shrink down quite a bit and don’t take much space to store.

I did keep one case of mushrooms to use fresh for Shabbos! The last time I made marinated mushrooms they were a big hit.

Avivah

Choosing a dehydrator

about dehydrators- is there a substantial difference in what you use a dehydrator for versus what you would use a vaccuum sealer for? i am fairly certain that at some point you researched this, so i am trying to not reinvent the wheel. is there a reason you chose one over the other?

I looked into getting a vacuum sealer at one point and didn’t see a need for it.  I might not understand well how the two work, but I’m under the impression that a dehydrator and vacuum sealer are two distinctly different appliances with different applications.  The dehydrator dries your food as a preservation technique, and the vacuum sealer sucks the air out of the container that you store something in, thereby creating a tight seal that will keep your food fresh long term.

as far as a dehydrator, i have done a lot of reading in magazines (like mother earth news, natural living, etc) and they seem to say that an electric dehydrator should only be a first step until you can handle a solar one. …. so, do you have any ideas about what would be a good intro dehydrator? i don’t want to spend a bunch, in case i don;t use it so much, but i don’t want a super junky one either, since the one i buy will most likely be the one i have for as long as it lasts. what factors should i look at before i decide? i read your posts on this, but i feel like i need a bit more guidance…

I think their point is philosophical and ecological, and I agree that solar dehydrating is good to do when you can.  If I could, I’d love to have non-electrical alternatives for all my appliances.  But solar dehydrating has its limits – like the weather!  And it takes a lot more time.  I need the reliability of a dehydrator that will do what I need, when I need, at a predictable rate.  I live where humidity can be high in the summer, which affects drying time.  I’ve wondered if I put my dehydrator in the sun if it would work well – I’d probably have to play around with leaving the door off to adjust for air flow.

As far as what to start off with, there are two ways of thinking about this.  The first is, buy something cheap and see if you use it enough to justify buying something more expensive.  That’s not my position.  I had a cheapie dehydrator and it was inefficient, the results were uneven and poor, and I’d never consider dehydrating valuable or worthwhile if I were still using something like that.  So I think, decide if dehydrating is something you’ll do a good amount of based on your research about it, and then get a good deal on something good that you can use and enjoy using for a long time.

Basically, a dehydrator is just a box with a heat source and a fan to circulate the air. Be sure that whatever model you get has a fan since without it, you’ll have to constantly rotate the trays and your results still won’t be even.  Get one that has a thermostat so you can control the temperature (different foods dry at different temps). A timer is a nice feature but not necessary.

I chose the 9 tray Excalibur, which has an excellent reputation.  I got a very good buy on it because I got a factory reconditioned model with a ten year warranty for $150.  But I know that this is still a lot of money and many people won’t consider that affordable.

American Harvest and Nesco are supposedly decent inexpensive alternatives (keep in mind the suggestions above about being sure to get a model with a thermostat).  Absolutely avoid Ronco, which is a piece of junk; I’ve heard very little positive feedback about it.  There’s a pretty new dehydrator out on the market called Good 4U which looks interesting; good price and seems to be good quality.  My concern with that one is that there’s no door because of the tray design so you’d have to have all the trays in all the time, and you couldn’t use it to let dough rise or make yogurt (which I haven’t yet done but many people do).

In the end I think getting something you can use long term is actually a more frugal strategy than getting something cheap and later getting something that really works the way you want it. Junk just isn’t a savings, not in time and not in money.

Avivah

Fig picking and preserving

Today I planned to go pear picking, but my boys came home from shul and told me on the way home they looked at the tree I had gotten permission to pick- and it had been stripped clean!  It had been loaded less than two weeks ago.  I didn’t pick them right away since I was waiting for school to start so my kids wouldn’t feel uncomfortable having lots of people watching them (it’s in a busy area).  And then I couldn’t pick them right before the camping trip because we were busy packing up.  Well, as the saying goes, opportunity waits for no man.  It’s a good reminder – if you find a good deal, or a good opportunity, don’t sit around assuming that it will be there for you when you feel like moseying around to it!

The boys also checked on the apple trees we picked from last year – hardly a fruit on the trees.  Later in the day I drove by another apple tree we picked that I was positive no one else would have picked from – nothing. I’m pretty sure that all these apple trees were hit by the late frost, just like the three pear trees we picked last year, and that’s why there’s no fruit.

So I decided to see if we could go fig picking, and that worked out beautifully!  We picked about 4 gallons of gorgeous figs – soft and delicious.  None of us had ever had fresh figs before.  Dh told me when I got home that the gemara says that fig trees have several different ripenings, which is exactly what I noticed when picking – half the fruit on the tree was hard and green and won’t be ready for several more weeks, and half were soft and juicy.

Since figs are so perishable, I wanted to deal with them right away.  Truth be told, I’m very sure that if I had left them around for a couple of days, the kids would have snacked them away.  But I didn’t want them to disappear with nothing to show for our trip, so I tried some new things.  First of all, I made fig jam, just honey, lemon juice, figs, and chopped walnuts.  It was more like a conserve technically, since it had fruit and nuts, but the recipe I used said ‘jam’.  Everyone loved it, but I didn’t think it looked attractive in a jar, which is too bad, since it is so delicious it would make a nice Chanuka gift.  But if it doesn’t look pretty, who would venture to open it up and try it?  So we have four pints for our family to enjoy.

Today I pulled up a bunch of plants from the raised beds to make room for some fall planting, including a lot of oregano and sage (which smelled amazing).  I put all of it into the dehydrator, and since there were some empty trays, decided to fill one tray with halved figs.  I didn’t want to dry all of them because dried fruit gets eaten up very quickly and it’s almost disheartening to see so much fruit being turned into such a small amount.  For veggies, it’s great because I cook them and they rehydrate, but the fruit is mostly used for snacks, and I don’t like watching it disappear so fast. 🙂  One tray doesn’t sound like a lot, but it’s 14 inches square and holds a nice amount.  I’ll see how that turns out in the morning.  So drying the figs was the second way I preserved them.

Since the fig jam called for honey, it isn’t something that everyone in my family will eat, so I wanted to make something that didn’t use sugar or honey.  I looked through lots of recipes online but didn’t find anything.  So once again, I ended up making up my own recipe. 🙂  I cooked a mixture of rhubarb, strawberry, and chopped figs, added a can of orange juice concentrate to it (would have preferred apple but didn’t have that), and then stirred in a box of pectin for low sugar recipes.  We have 3.5 pints of that.  It still doesn’t look as vibrantly colored as I’d like, but I guess I have to accept that unless I use some artificial ingredients, the fruits I used all cook into less distinct colors than they started out with. 

And that’s the end of the figs!

Avivah

Backpacking food preparation

Ds10 got back at 10:30 last night, and at 8 this morning, dd14 set off for several days of backpacking with four other girls and one adult.  I sometimes long for when everyone was young and doing the same thing at the same time – things that used to be very easy, like eating meals together or enjoying a family read aloud, now require conscious effort and planning.  So it will be a few more days before we all are together at the same time!

But don’t think I’m complaining – I’m very glad dd has this opportunity since it’s just the kind of thing she enjoys.  She’ll be spending three days and two nights on the Appalachian Trail.  Each girl is carrying all her food and supplies for the trip with her, so they need to pack light.  Yesterday I asked dd what the plan for the meals was, and she said that each girl was bringing enough of something for everyone.  For example, dd packed 24 packets of grits for breakfast, someone else is packing an equal amount of instant oatmeal, yet another girl will bring macaroni and cheese packets for dinner. They’re going to have a pot to boil water and a filter to get water as they go along, so that is the only cooking capacity they’ll have.  As I was listening to her, I was thinking that it didn’t sound incredibly well balanced to me.  Fortunately, I have a good supply of nuts and home dehydrated fruit I was able to tell her to take from so I didn’t need to run out at the last minute to buy her special food items.  As she was packing, it occurred to me that she could take some dehydrated veggies also.  Then the idea flashed though my mind that we could make her dehydrated meals to take!

So this is what we did yesterday.  We made a quick menu plan for three breakfasts and three dinners (they won’t be stopping for lunch so she packed nuts and dried fruit that she’ll be able to eat as they hike).  We decided to include cheese chunks with grits for breakfast for two mornings, and made a homemade instant oatmeal mix for her using quick oats, organic milk powder, dried apples (that we picked ten days ago), and some cinnamon.  She doesn’t generally eat sugar but someone who wanted to could add sugar or sucanat.

Then we turned our attention to the dinners.  I had hamburger rocks that I made several weeks ago (dehydrated and canned ground meat) that I initially thought I could include.  But she said that they were planning dairy dinners, so I shifted away from meat ideas.  At first she thought she’d be gone for three nights so we prepared for three dinners, but in the end they’ll be back in the evening in time for dinner at home.

For the first dinner she’ll have fish, mashed potatoes, and cooked vegetables.  I had in my pantry some vacuum packed envelopes of salmon and tuna (bought for .50 each instead of 3.29), so she took one of those.  It’s about 4 ounces so it’s good for one portion.  She cooked mashed potatoes, making them watery so they’d be able to be spread thinly on a paraflexx sheet to dry.  Then she cooked up a couple of boxes of frozen mixed vegetable and spread them on another sheet to dry.  This is different from how I dehydrate vegetables for cooking use- what I’ve dried is intended to be rehydrated by cooking and hot water wouldn’t make them soft enough.  Apparently when making instant meal kinds of foods, the trick is to first cook the food, then dehydrate it, and then use hot water and ten minutes in a covered dish to rehydrate it for eating.

That was dinner one.  Then dinner two was chili with cheese.  She made the chili and dehydrated it.  Then she cooked up more veggies – she made a batch of peas and another batch of mixed vegetables – and dried those.  We also cooked and dehydrated brown rice for another meal (was supposed to be eaten with albacore steak and vegetables)- even though she won’t need the food for a third dinner, I suggested to her that she take it just in case.  I don’t like the idea of sending her out on a trail with exactly the amount of food she’ll need – it’s good to have a little extra to be better prepared for eventualities. Hopefully everything will rehydrate as planned and she’ll be able to have well balanced food on the trail.

We had fun preparing the foods.  Dd said she hopes that the other girls aren’t jealous of her!! (They won’t be, I’m sure – if she was loaded down with chocolate, that would be something else!)   I’m telling you, it’s so liberating to be able to make things like this at home!  Now we’re starting to prepare for our annual camping trip next week (we usually go the last week of May but this week we had a week old baby so the plan obviously was adapted :)), and we’re considering if there would be a value in doing something like this on a larger scale for our family.

Avivah

Drying squash and pears

I love having the ability to preserve food!  It’s very fun to be able to find a way to use any amount of food that comes our way. 🙂  Yesterday I dried a load of yellow summer squash – we were given a box of them when the person who got them realized they were so perishable that they’d go bad before they could use them and didn’t want to wait for that point so they passed them to us; I still have enough to do another half load in the dehydrator.  We dried four trays as slices, since the kids like to snack on them, and six trays with chopped pieces, since that’s the way I use it most frequently for cooking.  I’ll do the rest of them chopped.  It will nice when the winter comes, to add a taste of summer to my dinners.  Right before the squash I dried the last of the peas and carrots I had in the freezer, to get them out of the way.

Today we went pear picking and got loads of delicious pears.  (Thanks, Alisa!  Your kids were a great help and a pleasure to spend time with!)  Fruit picking is a wonderful family activity, and I love being able to do it locally and for free rather than driving forty minutes away to pay for the experience.  I put a large wooden basket of them in the basement (where it’s cooler) for eating fresh, and will load the dehydrator with some before I go to sleep.   Last year when we got a lot of free pears we found that the kids really enjoyed them dried – it’s hard to dry them fast enough to keep up with their ability to eat them!  This time I’m not bothering with peeling them or deseeding them – we’ve sliced them thinly and put them on the trays at 135 degrees; they’ll be ready when I wake up in the morning.  As they ripen more I’ll probably want to can some, too.   Dh liked having them canned, so there’s something for everyone.  🙂

Tomorrow I’m taking the kids to a Hands On History Day at a historical museum.  I scheduled my monthly shopping trip to coincide, since the museum is somewhat in the area of where I’ll be going.  This museum day is the main reason I haven’t been in eight weeks (I didn’t want to go during the Three Weeks and it didn’t make sense to go right after Tisha B’Av and then to go again now for this trip).  After a few hours at the museum, we’ll do some shopping.  It will be nice to stock up again, and if I find some good produce bargains I’ll then have more dehydrating in my immediate future!

Avivah

Watermelon Candy

Until recently, it never occured to me to dehydrate any of the juicy fruits, like melons.  But I someone online mentioned doing it, and figured I could try it, too!  This was very easy and the kids really like the results – we call it watermelon candy.

Basically, all you do is this: cut the watermelon away from the rind, then slice it about 1/4 inch thick.  Make sure you use seedless watermelon since the seeds don’t enhance anything in the final product!  Put it in the dehydrator at 145 degrees (that’s the fruit setting on the Excalibur).  It will take longer than most fruits because it has such a high percentage of water, somewhere between twelve and twenty-four hours. 

When it’s done, it will be very thin and chewy, like a piece of fruit leather.  Because all the juice has been dehydrated, the flavor is strong and very sweet.

After slicing up the watermelon for dehydrating, I decided to use the rinds to make pickles with.  I wanted to make it today but dh took the van to the mechanic to check out why the starter fuse keeps blowing out before I could go to the store for more vinegar, so I’ll have to wait another day. Then I chopped up the final bit of rind and instructed ds10 to bury it deep in the part of the garden beds that are unplanted, where it can break down.  Not a bit of garbage left from the entire thing!  And I even maximized the electricity being used to run the full dehydrator – dd8 made paper yesterday, so I had her put her paper pulp on top of the dehydrator, where it dried very quickly with no extra expenditure of time or energy!

We still like fresh watermelon, and economically it’s a better buy to eat it fresh than dehydrated.  But it’s fun to experiment, especially when the experiments are successful!

Avivah

Sprouting and dehydrating wheat

I did something new this week!  Okay, so that’s not so unusual, but it’s still the first time I did it! 

About two or three years ago, I soaked, sprouted, and then dehydrated the wheat in the oven.  Oh my gosh, that was so laborious and I wasn’t happy with the end product after all of that time and effort at all.  So much so that I still have some of that wheat that has yet to be used, and not because I haven’t used much wheat.  Actually, at the rate I use wheat, I’ve gone through a number of fifty pound bags since then.  Because I felt it was a lot of energy to spend on something that didn’t give me much satisfaction or seem worthwhile, I resolved to spend my scads of excess time doing something more useful.  Until this week.

Thanks to a comment made here regarding soaking nuts back when I said it hadn’t been successful for me, I tried it again at that time and then used the dehydrator to dehydrate them.  Well, that made all the difference –  the results were great and I’ve soaked and dehydrated nuts successfully a number of times since then.

Remembering that, I thought that maybe using the dehydrator to dry the sprouted wheat would work, since it was the dehydrating aspect that didn’t work well for me.  I soaked a large amount of wheat and within a day, thanks to the warm weather and my non air conditioned indoor climate, the sprouts were visible.  I was surprised at how much wheat I was able to fit on the nine trays of the dehydrator – everything I had soaked fit easily.  The wheat dried in much less time than I expected, too.  When I got the dehydrator, I never expected it to come in handy in all the ways that it has – and if I was willing to use it for meat or dairy foods, I’d really be able to expand on the possibilities!

My reason for soaking the wheat is this: there are two ways to use flour that neutralizes the phytic acid. One is by soaking the flour, the other is by sprouting the wheat.  Until now, I’ve been soaking the flour.  But sometimes I don’t remember to soak the flour for something the night before, and it would be very time efficient to be able to prepare a lot of sprouted wheat in advance, so that I’d have it ready when I needed it.  Then all I’d have to do is grind it up right when I wanted to use some.

In the past, the sprouted wheat had a different consistency than regular wheat, so I don’t think this is something that will give me the same results in baking that I’m used to.  However, for quick breads, muffins, pancakes – that’s mostly what I soak the flour for – I think it should work pretty well.  I’ll be trying it the next couple of weeks and seeing how it works out.

Avivah

Explaining food dehydrating

>>Hi, would you mind explaining what it means to dehydrate vegetables?<<

Sure, I’d be happy to!  Dehydrating vegetables is a method of preserving them by drying.  It’s very simple to do when you have a dehydrator – I bought an electric one a few months ago that I’m very happy with that has been super useful.  It’s also possible to dry vegetables in the sun, using a solar dehydrator or even just putting food on screens when the sun is shining and covering it with muslin cloth.

I’ve found that once you have a dehydrator, it can be a big help in making your food budget go even further. I can take advantage of large amounts of produce that is on sale, since I have a way to preserve it before it goes bad.  Dried vegetables can be used in cooking very easily – they plump back up to regular size with cooking – and they take very little space to store since they shrink substantially when dried.

I put them in glass or plastic food grade containers and keep them on the shelf – they don’t need any refrigeration once they’re dehydrated.  Because we’re a lot of people using one regular sized fridge, this is also very helpful in using our available space efficiently.

Do you need a dehydrator to keep your food budget as low as mine?  No, obviously not, since I just started using one recently!  I don’t point to this as a major strategy that I use to keep food costs low, but rather a way to extend your food budget dollars, by being able to buy more at a low price and making it last for longer, so that you don’t have to pay full price when you run out of sale vegetables.

Avivah